Pages

Subscribe:

Ads 468x60px

Monday, March 18, 2013

A Box Pouch

I've been strolling around the Internet this past week and more and happened to come across several tutorials to make a box pouch. I loved the idea of something so simple to construct, yet in a shape that fabric generally doesn't acquire on it's own. I was tempted to try it since I was bogging down on the jacket I was sewing. The length in the body was too long and then I cut it just a tad too short. Grrrr! So, while I decided on the course of action to correct it, I decided to attempt one of these pouches myself. Here's the finished product:
Image
I used the tutorial from this site to construct this pouch: http://modernquiltlove.wordpress.com/2009/07/14/perfect-box-pouch-tutorial/ The only changes I made were to interface both layers of fabric, a 9 inch zipper instead of a 12 inch zipper. I found the dimensions for the smaller zipper here: http://www.theplaidscottie.com/2010/11/box-pouch-tutorial.html.  In addition to the other changes I added a binding to the bottom seam so the inside didn't look nearly as unfinished as it would have otherwise.  The second link shows you how to sew it up so that the lining is completely finished. I look forward to following her tutorial in the future! I'm also going to try this out of leather. I have an idea of how to line it, but I'll let you know when and if it works out. Here's the inside with the binding.
Image
As long as you don't look at the zipper too closely you don't see any of the unfinished edges. Here's some ideas to finish those edges: use a pinking shears or run all the edges through the serger before sewing. Just keep in mind your seam allowance. When I made this I didn't expect it to come out so well, so I had nothing in mind for it. After a bit of looking I decided that my serger tools and accessories would be perfect for it.
Image
See? Perfect! Now I need to see if I can make one of these babies out of leather! And the best part? I made this one on a new machine. A new vintage machine! I'll tell you all about it in the next post.


Saturday, February 23, 2013

Tulip Skirt

I originally posted this on my wordpress blog here: http://twirldesigns.wordpress.com/2013/02/23/winter-tulip-skirt/   Come follow me there to hear all about my sewing adventures!

I've had a stretch black velvet with silver flowers hanging around my craft room for about a year now. Four beautiful yards of lovely, smooth to the touch stretch velvet... just waiting to be turned into something. I had originally bought it to make a upscaled version of an infinity dress. I've been wanting an infinity dress for quite some time, but since I've had it for a year and haven't used it.... It was time to do something with it! So this is where New Look pattern 6735 comes in.


I decided that a cadigan/jacket (is cardigan even the right word? It doesn't have buttons...) would be perfect. So I went ahead and cut it out and.... it's been sitting in my sewing room. Well, no worries I also happened to cut out the skirt in the same fabric. I figured that if it would be overwhelming I would not have to wear them together. Separates are great to have and I need some!
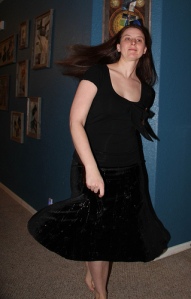
It sewed up on my serger like butter! I had to take an inch out of the seams overall to make it fit. Instead of sewing a casing for the elastic I serged the elastic to the inside of the skirt waistband. I wanted to avoid unnecessary bulk and it worked great! I will probably never wear the skirt with a shirt tucked in, so it works fantastically.

8407584400_b6398cdd3c

This skirt turned out great and I absolutely love it. In fact I wore it out with my amazing husband on Valentine's Day. We went up to Fredericksburg, TX and we went to a vintner's dinner at the Herb Garden. A four course meal, so absolutely delicious, and I was very stuffed and quite drunk by the end of it. hehehe Not exactly planned, but I'm a light weight and the beginning courses were small.  We had an excellent time and will hopefully be repeating it in the future. Do check them out!
I'll leave you with a few more pictures before I go!

8406491605_3b804ef317

8406491115_0e0150fdc6

Monday, January 28, 2013

Way Back When There was Cookies

Remember way back when I share my recipe for kourabiedes? And shared my lovely idea of a scrapbook cookbook of my favorite recipes? Well I haven't added much to it, but I do have pictures of the cookies!


Look at all that powdery goodness! I'm thinking I should have blogged these pictures sooner because now I want them again and they never last long in this house or anywhere else for that matter. Click here to see the original post!

Now I can get this picture printed and added to the cookbook. And I need to add several pages. I've found several ways I love to cook salmon and I need to add the meatloaf I blogged about to the scrapbook. It really was quite delicious!

Enjoy!

Friday, January 25, 2013

Knits, knits, knits. Oh how I love thee!

I have designed a new blog that will be dedicated mostly to my sewing, but I will still be posting my sewing blogs here. You can find me at: 

 http://twirldesigns.wordpress.com/2013/01/24/knits-knits-knits/


I really do. Love knits that is. I love how the stretchiness of the fabric is so forgiving and comfortable to wear.
I'm always on the look out for good patterns that are designed for knits and not always finding the ones I want. I am however always finding patterns that look like they would work just fine for knits and often better than any other fabric. I've been finding more and more patterns like this lately. I wonder if these patterns are being designed for wovens or as I like to say, "non stretchy fabrics" because people are uncomfortable attempting to deal with knits?

Image
Two patterns that would transfer well to knit fabrics

I do admit that I have had my fair share of trouble sewing knits and I have had many wadders that have ended up going the way of the dodo. If it isn't the fabric it's the sewing machine or more likely the serger acting up. Oh, the fun, but with practice it does get easier. Don't give up!

Image

These pants were designed for a woven and to be a loose pull on pant. I turned them into a fitted pant by taking in the hips, waist and inserted exposed zippers on both hips. I loved the contrasting pop of color! Unfortunately in taking these in I didn't leave enough seam in the rear and they failed on me after my third wear. I didn't think I would do them again just yet with another satin, so I turned to a lovely grey knit!

Image

Ta Da!!!!! I have a hard time not wearing these every day! They are the ultimate in comfort and they don't look like yoga or lounge pants unless I'm dressing them down. These pants dress up easily with a button up shirt and some fancy shoes. I will at some point be making this pattern again and I will be doing it in a knit again and I think I hear a colorful sating calling my name... I'll just have to remember that seam allowance!

And this is what the cat does while I edit pictures!

Sunday, January 13, 2013

More Food! Noms!


 I love easy meals! This is a very easy meal to prepare and can even make plenty of leftovers. That is if you don't eat it all first!

The ingredients:
  •  Carrots (I prefer baby carrots, but any will work)
  • onion (half or whole and your choice on what type. I prefer sweet onions for pretty much everything)
  • cream of celery or mushroom (enough to coat all ingredients)
  • Spicy breakfast sausage or deer sausage (spicy is key. The carrots and potatoes will absorb a lot of spice


  • Potatoes (you can use sweet potatoes, but prepare for the dish to be sweeter and pre-cook them some)
And if you have a handy dandy slicing KitchenAid attachment, use it, it will speed up your cook time and your preparation time! Otherwise you'll need to chop your carrots, onions, and your potatoes.

Brown your sausage. I normally use two packages of sausage if I want leftovers.
    Combine all ingredients together and mix until coated with your cream of celery or mushroom.
    Bake at 400 degrees until potatoes and carrots are soft. This will take about an hour if ingredients are chopped and about half if sliced.

Enjoy!

Let me know how you like it when you make it!

 *Please ignore my lovely paper plate!*